

SAP Fiori Catalog Creation : A Complete Step-by-Step Tutorial
Fiori Authorisation Design with help of the details points

1. What is an SAP Fiori Catalog?
An SAP Fiori Catalog is a collection of tiles (app shortcuts) grouped together and made available to users on the SAP Fiori Launchpad. Think of it as a curated “app library” — you define which apps belong together, configure their navigation targets, and then expose them to specific users through roles and authorization.
A catalog is the backbone of the Fiori Launchpad experience. Without a properly configured catalog:
Users won’t see tiles on the Launchpad
Navigation between apps (semantic object routing) won’t work
Backend OData services won’t be authorized correctly
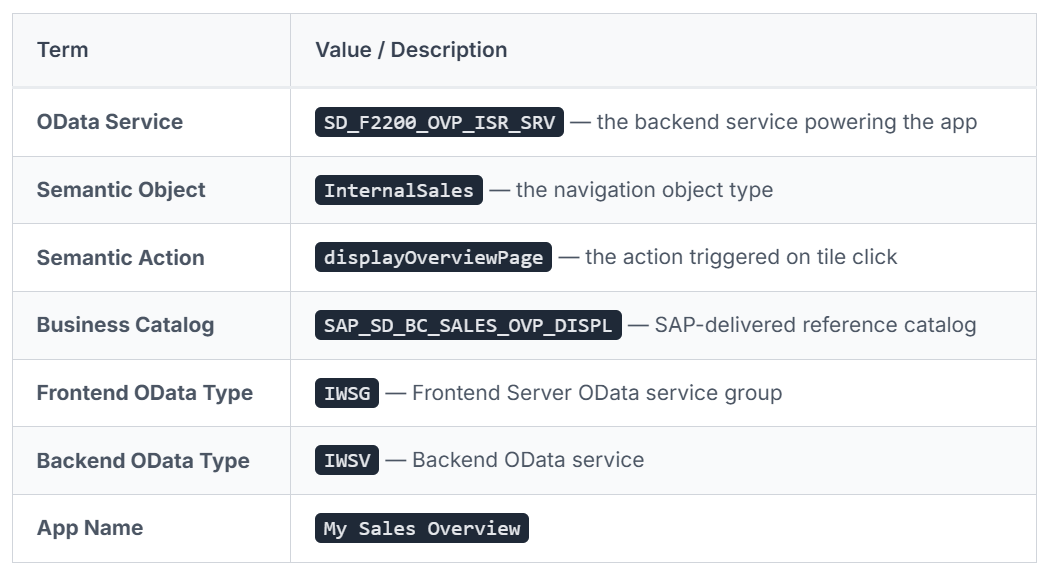
2. Key Terminology & Quick Reference
Before diving into the steps, familiarize yourself with these key values used throughout the process:
3. End-to-End Process Overview
The entire catalog creation process spans 12 logical steps across 3 phases:
Step 1  → Fiori App Library (find your target app)
Step 2  → Collect App Details (Semantic Object, Action, OData service)
Step 3  → Plan IDs (catalog ID, tile ID, target mapping ID)
Step 4  → Create Transport Request (SE10)
Step 5  → Create Catalog (/UI2/FLPD_CUST)
Step 6  → Add Business Catalog as Reference
Step 7  → Configure Target Mapping
Step 8  → Create Space & Page (/UI2/FLP)
Step 9  → Create PFCG Role (PFCG)
Step 10 → Add OData Services (IWSG + IWSV)
Step 11 → Generate Profile & Assign to User
Step 12 → Test on Launchpad
Critical Rule: Every step that creates or modifies configuration must be linked to a Transport Request before saving. Never skip this changes without a transport can’t be moved to production.
4. Phase 1 – Design: Launchpad Designer
T-Code: /UI2/FLPD_CUST
This phase involves creating your catalog and configuring the tile that users will see.
Step 1: Research in the Fiori App Library
Before touching any T-Code, go to the SAP Fiori Apps Reference Library (apps.sap.com/fiori) and search for your target app. You need to collect:
The Semantic Object (e.g.,
InternalSales)The Semantic Action (e.g.,
displayOverviewPage)The OData Service name (e.g.,
SD_F2200_OVP_ISR_SRV)The SAP Business Catalog it belongs to (e.g.,
SAP_SD_BC_SALES_OVP_DISPL)
Step 2: Plan Your IDs
Before creating anything, plan your naming convention:
Catalog ID: Use a
Z_prefix (e.g.,Z_MY_SALES_CATALOG)Transport Request: Create this first via SE10
Step 3: Create the Transport Request
T-Code: SE10
Open SE10
Click Create
Select Workbench Request or Customizing Request as appropriate
Give it a description:
"Fiori Catalog - My Sales Overview"Save and note down the transport number (e.g.,
DEVK900123)
You will need this transport number at every subsequent step.
Step 4: Open Launchpad Designer
T-Code: /UI2/FLPD_CUST
Navigate to
/UI2/FLPD_CUST(Launchpad Designer — Customer Scope)You’ll see the Catalogs section on the left panel
Click the “+” icon to create a new catalog
Step 5: Create a New Catalog
Enter your Catalog ID (e.g.,
Z_MY_SALES_CATALOG)Enter a Title (e.g.,
My Sales Overview Catalog)When prompted, assign it to your Transport Request created in SE10
Save the catalog
Step 6: Add the SAP Business Catalog as a Reference
This is the key step where the tile gets created:
Inside your newly created catalog, click “Add Reference”
Search for the SAP business catalog:
SAP_SD_BC_SALES_OVP_DISPLDrag and drop the business catalog into your catalog area
This automatically creates a tile referencing the SAP standard app
Why a reference? Using a reference (instead of a copy) means your tile stays in sync with SAP updates. The tile points back to the SAP catalog rather than duplicating it.
Step 7: Configure the Target Mapping
Target Mappings define where the tile navigates to when clicked.
In Launchpad Designer, click on Target Mappings tab within your catalog
Click “+” to add a new target mapping
Fill in:
Semantic Object:
InternalSalesAction:
displayOverviewPageApplication Type:
SAPUI5 ApplicationApplication ID: (your Fiori app ID)
Assign to Transport Request
Save
5. Phase 2 – Layout: Space & Page Management
T-Code: /UI2/FLP
After creating the catalog and its tiles, you need to define where on the Launchpad the tiles will appear. This is done through Spaces and Pages.
Understanding Spaces & Pages
A Space is like a tab or section on the Launchpad (e.g., “Sales” tab)
A Page lives inside a Space and holds the actual tile layout
Users see Spaces as navigation items; they see Pages as the content within each Space
Step 8: Create a Space
T-Code: /UI2/FLP
Navigate to
/UI2/FLPClick Spaces in the menu
Click “New” to create a Space
Enter:
Space ID:
Z_SALES_SPACETitle:
Sales
Assign to Transport Request
Save
Step 9: Create a Page within the Space
Inside the Space you just created, click “New Page”
Enter:
Page ID:
Z_SALES_PAGETitle:
Sales Overview
In the page layout editor, click “Add Section”
Within the section, click “Add Tile”
Search for and select the tile from your catalog (
Z_MY_SALES_CATALOG)Arrange the tile layout as desired
Assign to Transport Request
Save
6. Phase 3 – Authorization: PFCG Role Setup
T-Code: PFCG
This is arguably the most critical phase. Without proper role configuration, users won’t be able to access the app even if the tile appears on the Launchpad.
Step 10: Create a New Role in PFCG
T-Code: PFCG
Open PFCG (Profile Generator)
Enter a new Role Name:
Z_MY_SALES_OVERVIEW_ROLEClick “Single Role” and press Enter
Give it a Description:
"Role for My Sales Overview Fiori App"Save and assign to Transport Request
Step 11: Add the Space to the Role (Menu Tab)
In PFCG, go to the Menu tab
Click “Transaction” → “SAP Fiori Tile”
Or click the “Fiori” button to add Fiori apps directly
Add your Space:
Z_SALES_SPACESave
Step 12: Add OData Services (Authorization Tab)
This is the step many beginners miss. The tile appears but the app throws errors if OData services aren’t authorized.
In PFCG, go to the Authorizations tab
Click “Change Authorization Data”
You will add two types of OData services:
Frontend OData Service (IWSG)
In the Authorization Object search, find
S_SERVICE(OData service authorization)Add a new entry with:
Service Type:
IWSG(Frontend Server Group)Service Name: The service group associated with your app
This generates an
S_SERVICEauthorization object for frontend access
Backend OData Service (IWSV)
Add another
S_SERVICEentry with:Service Type:
IWSV(Backend OData Service)Service Name:
SD_F2200_OVP_ISR_SRV
This authorizes the backend service call
Why two types? SAP Fiori has a two-tier architecture:
Frontend (IWSG) handles the UI5 app delivery from the Frontend Server
Backend (IWSV) handles the data retrieval from the Backend (ECC/S/4HANA) Both must be authorized separately.
Step 13: Generate the Profile and Assign to User
After adding all authorizations, click “Generate” (the shield icon)
Give the profile a name (usually auto-suggested based on role name)
Click “Generate” to create the authorization profile
Go to the User tab in PFCG
Enter the User ID of the user who should receive access
Set a validity date range
Click “User Comparison” to sync the role to the user
Save
7. T-Code Cheat Sheet

8. Interview Answer Framework
When asked “How do you create an SAP Fiori Catalog?” in an interview, structure your answer using this 3-Phase Framework:
Phase 1 – Design
“I open Launchpad Designer using
/UI2/FLPD_CUST, create a new catalog, search for the relevant SAP Business Catalog (e.g.,SAP_SD_BC_SALES_OVP_DISPL), and drag it in as a reference tile. I also configure the Target Mapping with the Semantic Object and Action so the tile knows where to navigate.”
Phase 2 – Layout
“I then go to
/UI2/FLPto create a Space and a Page. I add the tile from my catalog into the Page, which makes it visible on the Launchpad when the user logs in.”
Phase 3 – Authorization
“Finally, I create an ABAP role in
PFCG, add the Space to the Menu tab, and then add both the IWSG (frontend) and IWSV (backend) OData service authorizations. This generates the requiredS_SERVICEauthorization objects. I generate the profile and assign the role to the user.”Always end with: “And every step is linked to a Transport Request before saving, so changes can be properly transported to Quality and Production.”
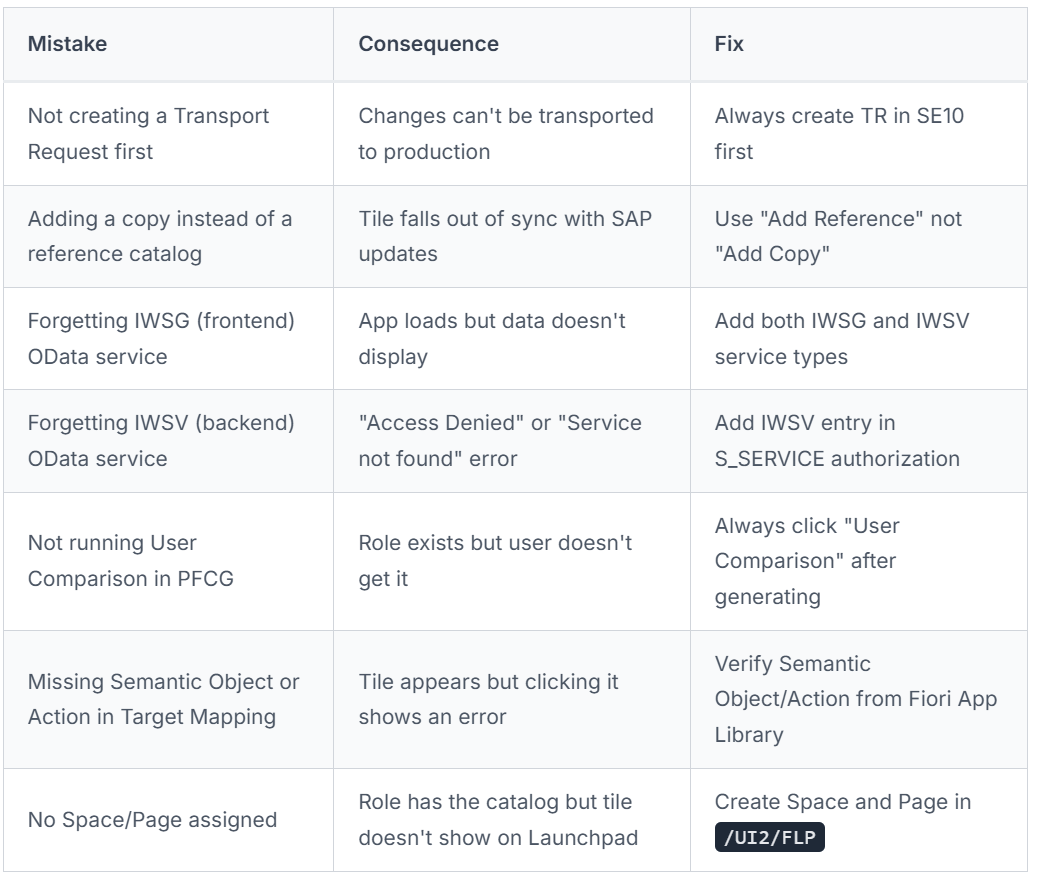
9. Common Mistakes to Avoid
Summary
SAP Fiori Catalog creation follows a clear 3-phase approach:
Design (
/UI2/FLPD_CUST) → Create catalog, add reference tile, configure Target MappingLayout (
/UI2/FLP) → Create Space and Page so the tile appears on the LaunchpadAuthorization (
PFCG) → Create role, add Space, authorize IWSG + IWSV OData services, generate profile, assign to user
Master these three phases, know your 5 T-Codes in point no 7, and always remember to link every change to a Transport Request and you’ll be well-prepared for both real-world implementation and interview questions on SAP Fiori Catalog creation.